How to Make a Sourdough Starter
Sourdough baking doesn’t have to be intimidating or complicated. With a little patience and simple pantry staples, you can build a healthy starter that lasts for years and helps you bake affordable, from-scratch bread anytime.
Cost: $2.35
Equipment
- Glass bowl (metal can affect bacteria and yeast growth)
- Wooden spoon
- Tea towel or clean kitchen cloth
Ingredients
- 1 cup unbleached all-purpose flour King Arthur recommended
- 1 cup filtered water
Instructions
Day 1:
- Combine 1 cup of flour and 1 cup of water in a clean glass bowl.
- Stir thoroughly, scraping the sides to fully mix.
- Cover with a tea towel and let sit at room temperature for 24 hours.
Days 2–5:
- Discard half of the starter each day.
- Feed the remaining starter with 1 cup flour and 1 cup water.
- Stir well, cover, and let rest for 24 hours.
Days 6–7:
- Feed the starter every 12 hours instead of once per day.
- Continue discarding half and adding 1 cup each of flour and water at each feeding.
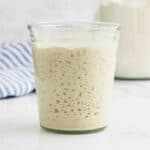
By Day 7:
- The starter should be bubbly, active, and roughly double in size after feeding. It’s ready for baking.
Notes
What if my starter is not ready on day 7? (My starter took until day 8 but it's not uncommon to take 14 days).
If your starter isn’t ready on day 7, this is actually very common. Sourdough starters can take longer depending on your kitchen temperature, the flour you used, and the activity of the yeast and bacteria.
Here’s what you can do:
Steps to Help It Get Ready:
Continue Feeding Regularly Keep discarding half and feeding 1 cup flour + 1 cup water every 12 hours (like Days 6–7). Consistency is key; the starter needs regular food to build strength.
Keep It Warm:
Yeast activity is faster at warmer temperatures (around 75–80°F). Place the starter somewhere warm in your kitchen, like near a stove or on top of the fridge.
Use the Float Test and Bubbling as Indicators Look for bubbles throughout the starter, not just on the surface.
Do the float test: if it floats, it’s ready. If it sinks, keep feeding.
Switch Flours (Optional) If your starter is sluggish, try using a mix of all-purpose and whole wheat or rye flour. Whole grain flours have more natural yeast and nutrients, which can speed up activity.
Patience:
Some starters take 10–14 days to become strong enough for baking. Keep feeding daily and monitoring; it will eventually become bubbly, rise well, and pass the float test.
How to Know If Your Starter Is Ready:
Mark the Level: Place a mark on the container after feeding. If the starter doubles in a few hours, it’s ready.
Float Test: Drop a small dollop (about a quarter-size) into room-temperature water. If it floats, the starter is active; if it sinks, it needs more time.
Storing Your Starter At Room Temperature: Keep loosely covered during feeding for airflow. Return to storage after a few hours.
In the Refrigerator: Use an airtight container for long-term storage.
Maintenance Tip: Clean the container occasionally to prevent crust buildup.
