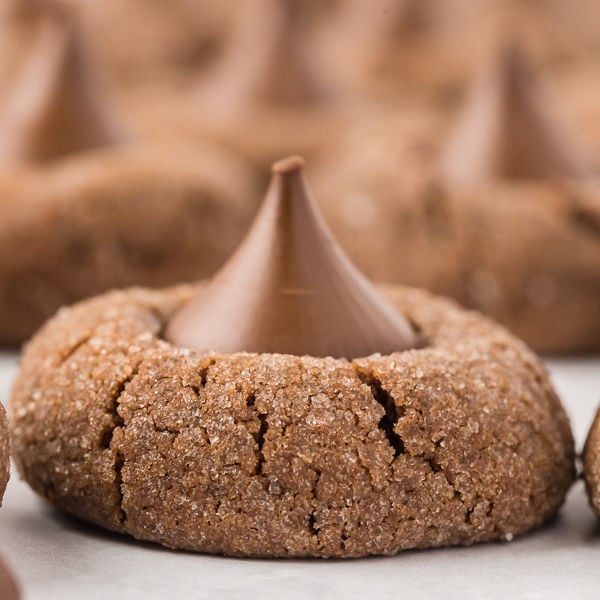
Chocolate lovers will love this Chocolate Kiss Cookies. Easy to make chocolate flavored cookie and topped with chocolate kiss.

We love making cookies for the holidays. This chocolate cookie with chocolate kiss is one of our favorites to make. It is rich in chocolate flavor and easy to make with simple ingredients.
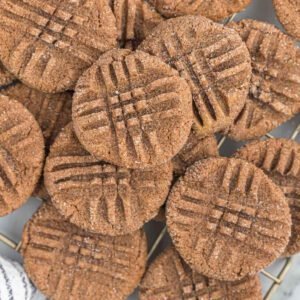
If you love our original recipe, Peanut Butter Kiss Cookies then you are going to love this Chocolate Kiss Cookie. The cookies bake easily and is the perfect holiday cookie.
Table of Contents
Why We Love This Hershey Kiss Cookies
If you love chocolate as much as I do, this is the cookie to make. Each bite is loaded with chocolate flavor and you be amazed how easy this made from scratch cookie is to make. These cookies remind me of the classic peanut butter blossoms made with creamy peanut butter.
This cookie is perfect for all your holiday baking. Add to your cookie trays, wrap up as a gift or take it to a holiday party. These melt in your mouth cookies can be made in many different ways to make them your own.
Ingredients
- Unsalted Butter – Softened at room temperature
- Granulated Sugar – Have a little more for rolling the cookies in
- Brown Sugar – If you are out, see The Best Brown Sugar Substitutes
- Egg – We recommend the egg be at room temperature
- All Purpose Flour – Measure flour correctly so cookies do not come out dry
Scroll to the bottom for the full recipe and ingredients in the recipe card.
Variations Ideas
- Powdered Sugar – Roll the cookie dough in powdered sugar for a different look.
- Christmas Sprinkles – If you are making for Christmas, roll the dough in Christmas Sprinkles.
- Change the Kiss – Use a different flavored kiss. We love to use a Hugs Kiss or a Peppermint Kiss for a twist on this classic cookie.
- Peanut Butter Cup – Use a mini peanut butter cup instead of a Hershey Kiss. Peanut Butter and Chocolate is my favorite combination.
- Chocolate Chips – If you are out of Hershey Kisses, top the cookies with chocolate chips. There are many different flavors to choose from.
- Sprinkles – These cookies are perfect for holidays and special occasions. You can easily add sprinkles to match any color theme. Simply press the dough ball in sprinkles prior to baking.
- Holiday Sprinkles – I think red and green would be so pretty for Christmas, pastel for Easter and so much more.
How to Make Chocolate Kiss Cookies
- Prepare oven – Preheat the oven to 350 F.
- Melt Chocolate Chips – Place the semi sweet chocolate in a microwave safe large bowl. Heat in 20 second intervals, stir after each interval until the chocolate is fully melted. Set aside for the chocolate to cool.

- Cream Sugars and Butter – Cream together the butter, sugar and light brown sugar until smooth and fluffy. You can combine in a bowl of a stand mixer with a paddle attachment or a hand held mixer.

- Mix in egg, vanilla and melted chocolate – Add large egg, teaspoon vanilla extract and cooled melted chocolate and beat together. You do not want the chocolate to be hot or it will cook the egg.

- Stir Dry Ingredients together – Whisk together flour, baking soda, kosher salt or baking powder, and cocoa powder in a separate bowl.
- Mix dry and wet ingredients together – Slowly add dry ingredients to the creamed mixture, beating until incorporated.
- Roll into balls – Roll into 24 1 inch balls or about a tablespoon size of dough. Roll each of these cookie dough balls into a bowl of granulated sugar and place on a baking sheet several inches apart.

- Bake Cookies – Bake for 10-12 minutes until the edges of the cookies are set. While the cookies are baking, unwrap the Hershey Kisses so they are ready.

- Top with a Kiss – Once the cookies are done, place a Milk Chocolate Kisses in the center of each cookie once you remove them from the oven.

- Cool, Serve and Enjoy – Then move the cookies from the pan to a wire rack to cool completely.

Recipe Tips
- Making balls – We like to use a cookie scoop to make the balls. It allows for the balls to be even in size.
- Cookie Dough – The dough may seem soft to you but resist the urge to add more flour. This is the consistency it is supposed to be. Too much flour will result in crumbly cookies.
- Completely cool – It is crucial to allow the cookies to cool completely before storing. You do not want to risk losing their pretty appearance.
- Room temperature butter – You want the butter to be room temperature. It should not be cold or warm.
- Flour – Spoon the flour into the measuring cup and then level with a knife. This will prevent too much flour from being in your dough if you scoop the measuring cup and pack it in.
- Unwrap the candy – It is important to unwrap the candy while the cookies bake. You will need to work quickly once they are out of the oven. The longer the cookies sit, the less likely the Hershey Kiss will adhere.
- Baking Sheet – We like to line out baking sheets with parchment paper to easily serve the cookies and also makes clean up a breeze.

How to Freeze Chocolate Kiss Cookies
We love making cookies ahead of time and freezing them for all our holiday plans. These cookies freeze great and stay good for about 4 months if stored properly.
- Cool Completely – Make sure they cool completely before storing.
- Wax Paper – When stacking cookies in the container, place a wax paper between the layers.
- Gently Stack – When layering cookies, make sure you gently stack the cookies. This makes sure that the Hershey Kisses do not break.
- Thaw Cookies – When you are ready to enjoy, thaw cookies on the counter.
For even more tips, see How to Freeze Cookies for Baking.
Frequently Asked Questions
There could be multiple reasons why your cookies are coming out flat. One reason is that the oven is to hot and it is melting the butter to fast which causing the cookies to spread. Make sure to not overmix the batter. You want to mix the cookie dough until the ingredients are combined.
The cookies will last in an airtight container for up to 5-7 days at room temperature.

More Easy Cookie Recipes

We love to hear from you. If you make Chocolate Kiss Cookie Recipe, please leave us a comment or a star review.
Chocolate Kiss Cookies
Ingredients
- ¾ cup Unsalted Butter softened at room temperature
- ½ cup Granulated Sugar plus a little more for rolling the cookies in
- ½ cup Brown Sugar
- 1 tsp Vanilla
- 1 Egg
- 2 cups All Purpose Flour
- ¼ cup Unsweetened Cocoa Powder
- ¼ cup semi sweet chocolate melted
- 1 ½ tsp Baking Powder
- ½ tsp Salt
- 24 Milk Chocolate Hershey Kisses unwrapped
See how we calculate recipe costs.
Instructions
- Preheat the oven to 350 F.
- Place the semi sweet chocolate in a microwave safe bowl. Heat in 20 second intervals, stir after each interval until the chocolate is fully melted. Set aside for the chocolate to cool.
- Cream together the butter, sugar and brown sugar until smooth and fluffy.
- Add egg, vanilla and cooled melted chocolate and beat together. You do not want the chocolate to be hot or it will cook the egg.
- Whisk together flour, cocoa powder, baking powder and salt in a separate bowl.
- Slowly add dry ingredients to the creamed mixture, beating until incorporated.
- Roll into 24 1 inch balls. Roll each of these cookie dough balls into a bowl of granulated sugar and place on a cookie sheet several inches apart.
- Bake for 10-12 minutes until the edges of the cookies are set. While the cookies are baking, unwrap the Hershey Kisses so they are ready.
- Once the cookies are done, place a Hershey Kiss in the center of each cookie once you remove them from the oven.
- Then move the cookies from the pan to a wire rack to cool completely.
Recipe Notes
Nutrition Facts