This darling Easter Bunny Cake looks so impressive but is very simple to make! Surprise your kids with this fun bunny cake recipe! It’s so yummy too!
Every year we make these Easter Basket Cupcakes and the kids love them! I thought this year I would try something different and make this Easy Bunny Cake! Don’t let this cake scare you because it is actually very simple. It looks really fancy but it’s not difficult to make.
We break it into step by step instructions so it’s really very easy to do! You might also like to make Bunny Cupcakes. Sometimes I like to make both and put the cupcakes around the cake. So cute and a great way to celebrate the Easter Holiday.
Check out these other Easy Easter Recipes to make this holiday.
Table of Contents
Why We Love This Easter Bunny Cake
This Easter Bunny Cake is so delicious and made with simple ingredients. My mom made this every year when I was growing up for our Easter Celebration. Now I make it for my family and my kids look forward to it every year!
Start with a cake mix to make this bunny head. There is no need for fancy cake pans. You just need 2 8-inch round cake pans and a few decorations to make this bunny cake.
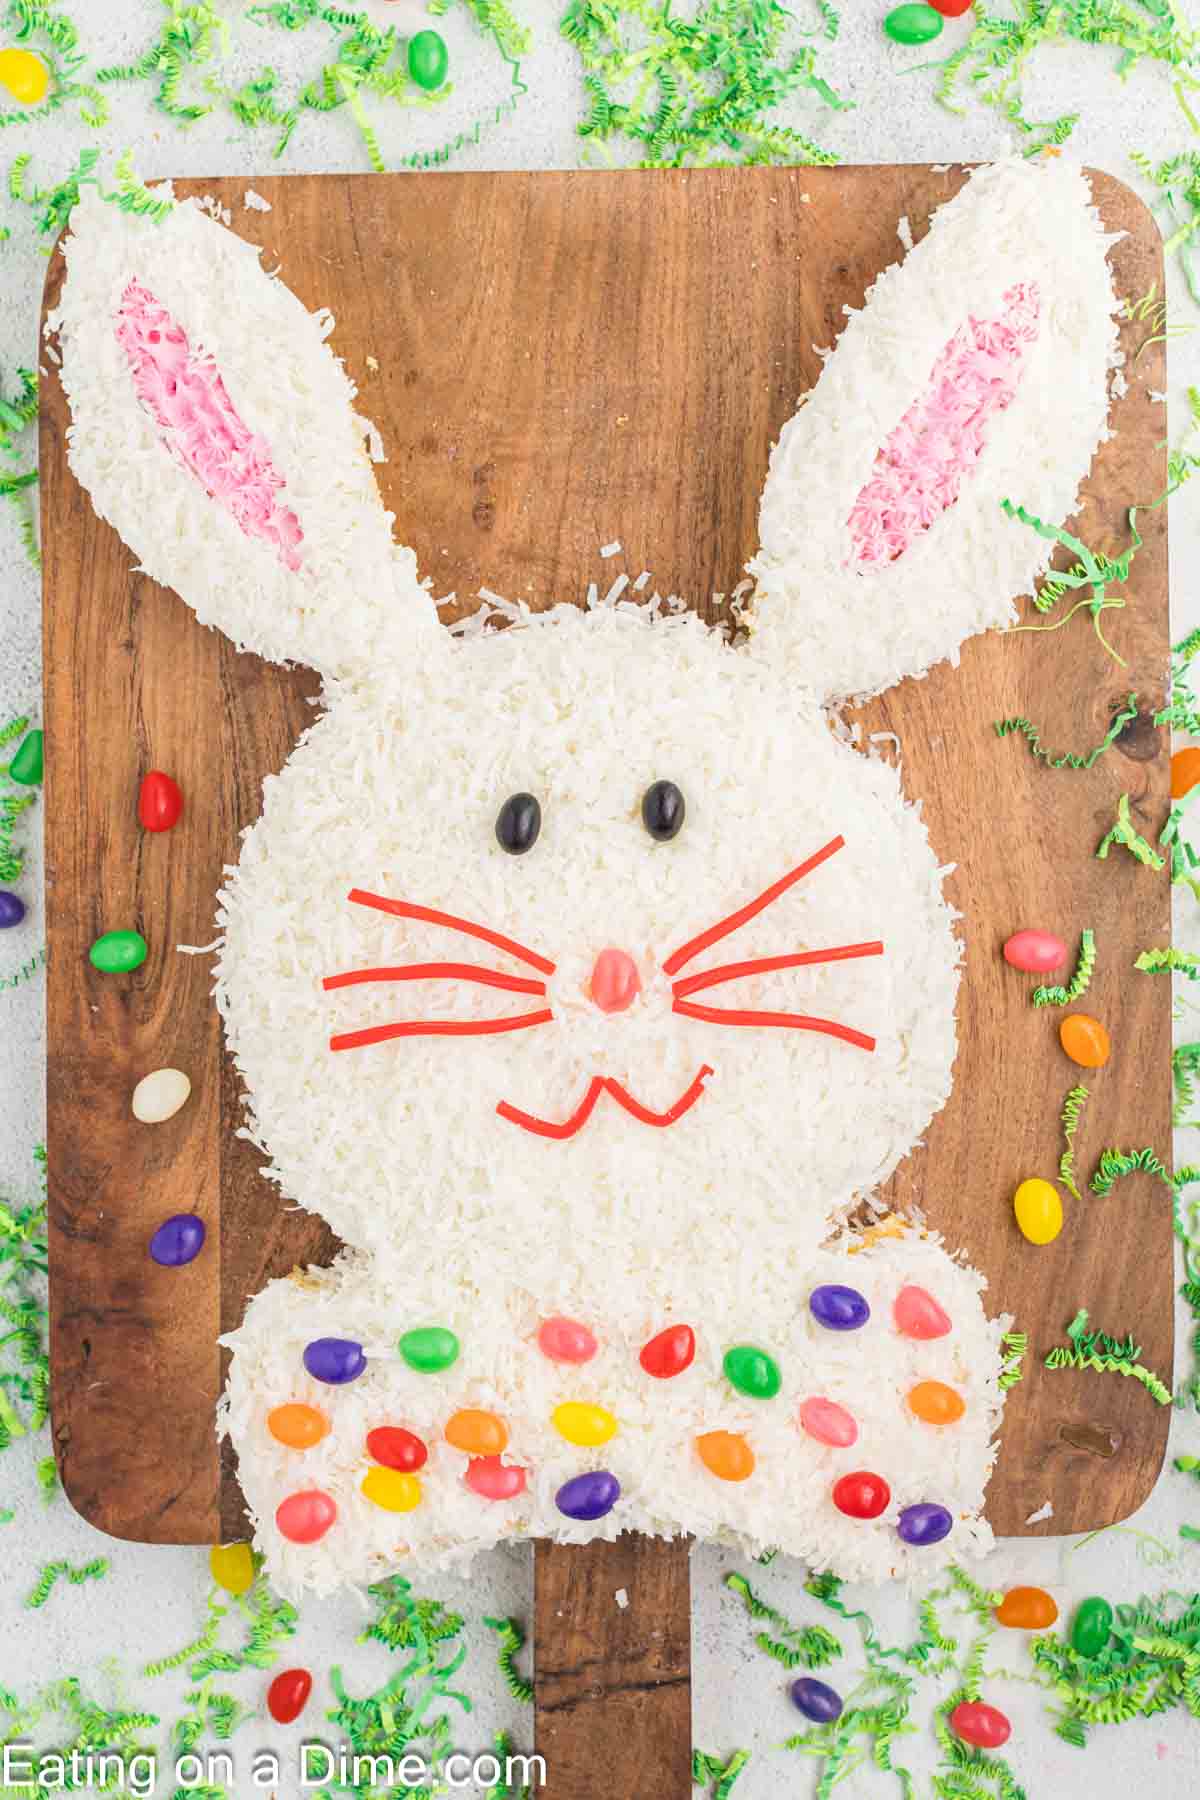
I like to put this gorgeous cake on a cake stand or serving tray and sprinkle a little extra coconut and jelly beans around. It’s so pretty! The white coconut on the bunny with the green coconut “grass” contrast so nicely and provide an instant burst of color.
Ingredients

- Yellow Boxed Cake Mix – Feel free to use any flavor of cake mix that you prefer. Carrot cake is a great substitute
- Oil – I like using vegetable oil but use any type of oil that you perfer
- White Frosting – We used store bought white frosting but you can also use chocolate frosting. If you have a few extra minutes, this Vanilla Buttercream Frosting or Cream Cheese Frosting is amazing. It’s very simple to make and you just can’t beat the taste! So good!
- Light Pink Food Coloring – For the best color use gel food coloring
Scroll to the bottom for the full recipe in the recipe card.
How to Make Easy Bunny Cake
- Step 1 – Preheat the oven to 350 degrees F. Spray 2 9-inch round cake pans with non-stick cooking spray or line with parchment paper. I use Wilton cake pans but any will do. Just make sure you have a good set!
- Step 2 – Combine the cake mix in a large bowl with a hand mixer or electric mixer with paddle attachment on low speed based on the package instructions.
- Step 3 – Pour the cake batter evenly into the cake pans.

Step 4 – Bake the cakes based on the package instruction for 9 inch round pans. Allow the cakes to cool for 10-15 minutes at room temperature. I use a set of these baking racks and they are great!

Step 5 – Gently remove the cakes from the pan and transfer to a wire rack to cool completely. Let the cakes cool completely at room temperature. Place one of the cakes on a cutting board. Cut 2 convex-shaped ears from each side of the cake and the center should resemble a bow tie.

Step 6 – Place the other cake on a large serving platter. Place the ears above this cake and the bow tie of the bunny at the bottom of the serving platter.

Step 7 – Place the pink frosting in a piping bag fitted with a star tip. Pipe the frosting into the center of the bunny ears.

Step 8 – Carefully frost the remaining of the cake with the remaining white frosting.

Step 9 – Gently press the coconut onto the white frosting on the cake.
- Step 10 – Use black jelly beans for the eyes of the bunny and a pink jelly bean for the nose of the bunny.
- Step 11 – Use the red licorice rope to make the mouth and the whiskers of the bunny.
- Step 12 – Decorate the bow tie with the remaining jelly beans.
- Step 13 – Then the Easy Easter Bunny Cake is ready to serve and enjoy!
Expert Tips
- Easter Bunny Shape – Don’t worry if this adorable bunny cake doesn’t look quite the way you are hoping when you are icing it. The coconut truly smooths everything and makes it all come together. It hides any imperfections and gives it that cute fluffy bunny look!
- Coconut – We used flaked coconut instead of shredded coconut. But use what you prefer.
- Cakes – Allow the cakes to cool to room temperature before cutting cake with serrated knife into the shapes and before adding the frosting.

Frequently Asked Questions
Yes, we like using a cake mix because it saves many steps and ingredients. But make this Easter Bunny Cake with this Best Vanilla Cake Recipe.
Yes, this is the perfect cake to make ahead of time. I like to bake the cake about 24 hours of decorating so the cake is completely cool before adding the frosting and decorations.
Store the leftovers in the refrigerator covered with plastic wrap for up to 2-3 days.
More Easy Easter Recipes

We love to hear from you. If you make this Easter Bunny Cake Recipe, please leave us a comment or a star review.

Easter Bunny Cake
Ingredients
For the Cake:
- 1 package Yellow Cake mix
- 1 cup water
- ⅓ cup vegetable oil
- 3 large eggs
For the Frosting and Decorations:
- 2 containers white frosting (16 ounces each)
- Light Pink Food Coloring
- 3 cups Flaked Coconut
- Red Licorice Rope
- Jelly Beans
See how we calculate recipe costs.
Instructions
- Preheat the oven to 350°F. Spray two 9-inch round cake pans with non-stick cooking spray.
- In a large mixing bowl, combine 1 package yellow cake mix, 1 cup water, ? cup vegetable oil, and 3 large eggs. Mix according to the package directions until smooth.
- Divide the batter evenly between the two prepared cake pans.
- Bake according to the package directions for 9-inch round cake pans.
- Allow the cakes to cool in the pans for 10–15 minutes.
- Carefully remove the cakes from the pans and place them on wire racks to cool completely.
- Place one cooled cake on a cutting board. Cut two convex-shaped ear pieces from opposite sides of the cake. The center section should resemble a bow tie.
- Place the second cake on a large serving platter to form the bunny's face.
- Position the two ear pieces above the face and place the bow-tie-shaped center piece below the face.
- Place approximately half of one 16 oz container of white frosting into a bowl. Add light pink food coloring and stir until evenly colored.
- Transfer the pink frosting to a piping bag fitted with a star tip.
- Pipe the pink frosting into the center portions of the bunny ears.
- Frost the remaining cake surface with the remaining white frosting from both containers.
- Gently press 3 cups flaked coconut onto the frosted cake to create the bunny’s fur.
- Use black jelly beans for the eyes and a pink jelly bean for the nose.
- Cut red licorice rope pieces to create the mouth and whiskers.
- Decorate the bow tie with additional jelly beans.
- Slice, serve, and enjoy.

This was so fun and yummy for easter!
Ours definitely didn’t turn out as good as these pictures, but was delicous and a fun dessert to make with the kids!
This was so fun to make with my kids, and it was a cute addition to our table this Easter.
So much fun for Easter
Perfect for Easter!
Super easy!!
So perfect for Easter!
Loved the video! So helpful! Made this cake really easy to make!
Adorable! This cake is so cute and looks simple to make. I’ll be making for Easter this year – Thank you!